
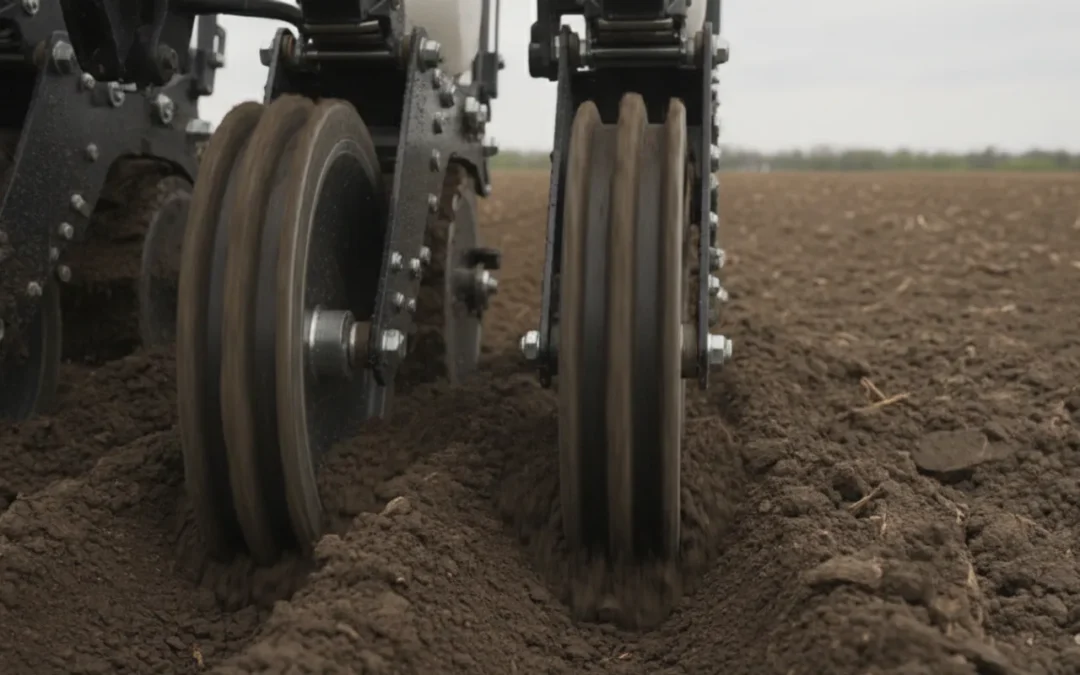
Closing wheel soil contact problems can look like a wheel problem even when the cause is pressure, alignment, or soil moisture. The useful question is not simply whether the furrow looks closed. It is whether soil has moved around the seed without leaving an air gap, smearing the sidewall, or compacting the seed zone. A repeatable check in the field helps separate those conditions before you change parts or settings.
Ask about your closing-wheel setup
Key Takeaways
- Check the seed trench itself, not only the soil surface. A closed-looking slot can still hide a sidewall gap or exposed seed.
- Compare several rows and several places in the field before changing a setting. A problem isolated to one row points to a different cause than a pattern across the planter.
- Inspect alignment and wear before adding pressure. More force may mask a symptom while increasing compaction in the wrong conditions.
- Use a short, controlled field check after each adjustment. Change one factor at a time and record the result.
What does good closing-wheel soil contact look like?
After the closing wheels pass, the seed furrow should be covered with soil that is in contact with the seed and the surrounding furrow walls. The surface does not have to be perfectly smooth. The important check is what happened below the surface: the seed is covered at a consistent depth, soil has moved into the trench, and there is no obvious open slot or void alongside the seed.
Dig up a short section with a hand trowel rather than judging only from the tractor seat. Start beyond the wheel track, lift the soil carefully, and expose several seeds without pulling them through the furrow. Look at whether the trench has closed, whether the seed is surrounded by soil, and whether a firm, shiny sidewall or a loose cavity remains. Repeat the check at more than one point, because moisture and texture can change within a pass.
Keep the opener, gauge wheels, and closing wheels in view as one row-unit system. The opener makes the trench; gauge-wheel setup affects depth and soil flow near the trench; closing wheels bring soil back over the seed. A concern that appears to be poor closing may begin earlier in the sequence. For background on how the contact goal is described, see this guide to closing wheels for corn.
How can you tell poor soil contact from a pressure problem?
Pressure is one possible cause, but it is not a diagnosis by itself. Too little closing force may leave an open slot or loose soil that does not settle around the seed. Too much force can press wet soil into a dense, smooth wall, or create a compacted band that the seedling must push through. The right response depends on the soil condition and the specific sign you find.
- Possible low-force sign: The trench remains visibly open, soil falls away from the seed, or the furrow opens again after the row unit passes. Check that the wheel arms move freely and the wheels are making contact with the row before increasing force.
- Possible excess-force sign: The sidewall looks shiny or smeared, the slot is pinched shut in wet soil, or the seed zone is firm while adjacent soil is less compacted. Reduce the load cautiously and inspect another short run.
- Not enough evidence: A rough or cloddy surface alone does not tell you whether pressure is wrong. Open the furrow and inspect the seed zone before making a change.
Compare the same row in a drier or better-drained area if one is available, and compare neighboring rows under the same conditions. If a pressure change improves one area but makes another worse, the soil may be too variable for a single setting to solve every symptom. Make a note of soil moisture, texture, speed, and the row number when you inspect. You can review the basics of why closing-wheel pressure matters, but use your own furrow checks to guide an adjustment.
How do alignment problems differ from soil-contact problems?
A closing wheel that tracks off-center can move soil unevenly. One side of the trench may be packed or covered while the other side remains open. The seed may appear exposed more often on one side, or the wheel path may consistently favor one edge of the row. These clues are more meaningful when they repeat on the same row across a short distance.
With the planter safely stopped and raised according to the operator’s manual, check whether the closing wheels are centered over the opener trench and whether the assembly has visible looseness, bent parts, or unequal spacing. Do not put hands near pinch points, and do not work under unsupported equipment. Check for debris and obvious wear as well. If only one row shows a repeated one-sided pattern, compare that assembly with a neighboring row before adjusting the entire planter.
Alignment can interact with pressure. A wheel that is not tracking the trench may seem to need additional force, but added pressure does not correct the path. Look at the wheel marks and the exposed furrow together. If the wheel tracks look displaced, correct the mechanical setup first, then repeat the soil check. This closing-wheel field guide can help frame the parts of the closing process, while a Germinator closing wheel product overview shows one available wheel design; neither replaces checking fit and setup on your planter.
When is moisture the more likely cause?
Soil that is too wet may deform instead of crumbling. It can smear along the trench wall, stick to the wheels, or form a dense surface seal. In those conditions, changing wheel pressure may not produce a clean, friable closure. Soil that is very dry or cloddy can also make consistent closure difficult: large clods may bridge over the trench, leaving voids beneath them, while loose dry soil may not settle around the seed evenly.
Look for a pattern across the field. If the same kind of smear or clod bridging appears on several rows in a wet or dry zone, soil condition may be more important than one wheel assembly. If the issue is restricted to one row under similar conditions, inspect that row’s wheel movement, alignment, and wear. A single exposed seed does not prove a moisture problem; several checks across a consistent area make the diagnosis stronger.
For no-till conditions, the surface residue and soil structure can affect how material moves back into the trench. A University of Vermont Extension fact sheet notes that notched discs can move loose soil over a seed trench in tough no-till conditions, helping a rear press wheel improve seed-to-soil contact. That describes a particular option and condition, not a universal recommendation for every planter or field. Read the UVM closing-wheel fact sheet alongside your own soil and equipment checks.
What pattern in the field helps isolate the cause?
Use the pattern of the symptom to decide what to inspect first. Check at least a few rows, including a row that looks good if possible. Open furrows at comparable points and record what you see. The table is a starting point, not a substitute for the planter manual or a qualified equipment technician.
| What you observe | What it may point to | First check | Next practical step |
|---|---|---|---|
| Open slot across several rows | Soil condition, insufficient contact, or a system-wide setting | Inspect the trench and compare soil moisture and residue | Check wheel engagement and make a small, controlled setting change if appropriate |
| One side of the trench stays open on one row | Off-center tracking, uneven wheel contact, or a row-specific issue | Compare wheel alignment and assembly condition with a neighboring row | Correct the row-specific mechanical issue before adding force |
| Shiny, smeared trench wall | Wet soil and/or excessive compression | Check whether the sign repeats in wet areas and inspect below the surface | Avoid assuming more pressure will help; reassess conditions and settings |
| Clods cover the slot but gaps remain underneath | Clod bridging, dry soil, or uneven soil flow | Lift the cover carefully and inspect seed-to-soil contact | Compare nearby soil and residue conditions; consider whether field conditions are workable |
| Problem limited to one wheel or row | Wear, restricted movement, damage, or adjustment difference | Inspect that assembly against an unaffected row | Repair, replace, or adjust only after confirming the cause |
How do symptoms change across different patterns?
Think about both the shape of the furrow and where the symptom occurs. An open slot down the row means something different from a trench that closes on one side and stays open on the other. The first may involve soil movement or overall wheel engagement; the second more strongly suggests that soil is not being moved symmetrically. Neither pattern proves a cause on its own, so use it to choose the next inspection rather than jump straight to a setting change.
A useful comparison is one affected row next to one apparently normal row, planted through similar ground. Open both furrows at similar distances behind the planter. If the affected row has a persistent sidewall gap while the neighboring row has soil contacting the seed, inspect the affected row’s centering, free movement, and hardware. If both rows have a similar smeared wall in the same wet area, look at moisture and field conditions before treating one wheel as faulty. If the pattern changes at a boundary, such as a wetter swale or heavier residue, record that transition; it can explain why one setting does not perform the same everywhere.
Also distinguish an open trench from a surface depression. A shallow depression may remain after the wheels pass even when soil is in contact with the seed. Conversely, residue or loose soil can make a furrow look covered while a cavity remains beneath a clod. Gently remove cover from the side instead of pulling the seed upward. Observe whether soil fills around the seed and whether the furrow wall is intact or smeared. These details are more diagnostic than a visual impression from the cab.
Use the same approach when comparing wheel designs. The wheel should be judged in the soil and planter setup where it will work, not by appearance alone. Soil texture, residue, moisture, row-unit geometry, and operating conditions all influence how soil moves. A wheel style that moves loose soil effectively in one situation is not automatically the right selection for every soil or tillage system. That is why a short, representative trial and careful furrow inspection matter more than a blanket rule.
How should you run a controlled field check?
- Choose a representative stretch. Avoid headlands, turns, and abrupt transitions for the first check. Note the field zone and conditions so you can return to a comparable spot.
- Plant a short pass at the normal operating setup. Do not change several settings before establishing what the current setup is doing.
- Stop safely and inspect the furrow. Follow the operator’s manual for stopping, lowering, raising, and securing the planter. Keep clear of moving or unsupported equipment.
- Expose multiple seeds gently. Check coverage, sidewall condition, voids, and whether the seed is surrounded by soil. Check more than one row and location.
- Identify the repeated sign. Decide whether it is open furrow, one-sided closure, smeared soil, clods, or a row-specific pattern. Record row numbers and conditions.
- Change one factor only. If evidence points to a setting, make a small change within the equipment maker’s guidance. If evidence points to alignment, damage, or binding, address that first.
- Repeat the pass and comparison. Use the same type of soil and check the same signs. Keep the change only if the furrow improves without creating a new problem.
A simple note can be more useful than a memory of what the furrow looked like: record date, field zone, soil moisture, residue, speed, settings changed, affected row numbers, and what the seed trench showed. If you operate different planter configurations, note the model and wheel assembly too. This makes comparisons more useful across fields and seasons.
What should you inspect before replacing a wheel?
Before buying parts, check whether the wheel turns and moves as intended, whether bearings or hardware have excess play, whether the assembly is bent or damaged, and whether the wheel surface shows uneven wear. Look for packed mud, residue, or other material that may prevent normal movement. Use the manufacturer’s maintenance instructions for safe inspection and service intervals.
Also confirm that the wheel is compatible with the planter and row-unit configuration. A product that works for one setup is not automatically the right fit for another. If you are comparing options, review the Germinator closing wheel specifications and the broader Farm Shop MFG product range. For wheel parts, the standard bearings information may be relevant when inspection points to a bearing concern. Confirm the actual part and fitment for your machine before ordering.
A replacement wheel may address worn or damaged hardware, but it will not correct unsuitable field conditions, incorrect alignment, or a setting that is too aggressive. Keep the diagnosis separate from the purchase decision. If you are not sure whether the pattern points to a part or an adjustment, take photos of the wheel track and opened furrow and describe the row-unit setup when seeking help.
Which common checks lead to the wrong conclusion?
- Judging only by the surface. A smooth surface can hide a void, and a rough surface can still have good seed contact. Open the trench.
- Changing pressure before checking alignment. Added force may make a crooked tracking pattern more severe rather than solve it.
- Using one observation to describe the whole field. Soil moisture, residue, and texture can change within a short distance. Repeat the check.
- Changing multiple settings together. If the result improves or worsens, you will not know which change mattered.
- Comparing unlike conditions. A check in a wet depression is not a fair comparison with a drier rise. Compare like with like.
- Assuming every seed should look identical. Focus on a repeated pattern that affects coverage and contact, rather than reacting to one unusual seed or clod.
When the findings are mixed, avoid forcing a single explanation. For example, a row may track slightly off-center and also pass through wetter soil. Correct a confirmed mechanical issue, then test again under comparable conditions. If the soil itself is smearing across multiple rows, the practical answer may be to wait for better conditions rather than continually increase pressure.
When should you ask for equipment help?
Get assistance if a wheel assembly is damaged, binds, has significant looseness, or cannot be aligned using the equipment’s approved adjustment procedure. Also ask for help if the symptom persists across controlled checks and you cannot tell whether it comes from the row unit, the soil condition, or another planter setting. Bring the planter make and model, row-unit details, wheel type, field conditions, and photos of both the surface and the opened furrow.
Farmers comparing closing-wheel options can review the Germinator closing wheels page or Farm Shop MFG resources for related information. For a question about a particular setup, use the contact page and include the details from your field check. A good description of the symptom is more useful than a general statement that the wheels are not closing well.
Review Germinator closing wheel details
Make the diagnosis from the furrow, not the symptom alone
To tell whether closing wheels are making the right soil contact, uncover the seed and look for a repeated pattern: coverage, sidewall condition, voids, and centered soil movement. Then compare rows and field zones, inspect alignment and wheel condition, and make one controlled adjustment at a time. That sequence helps distinguish a pressure issue from alignment or moisture—and gives you a sound next step before changing equipment.