
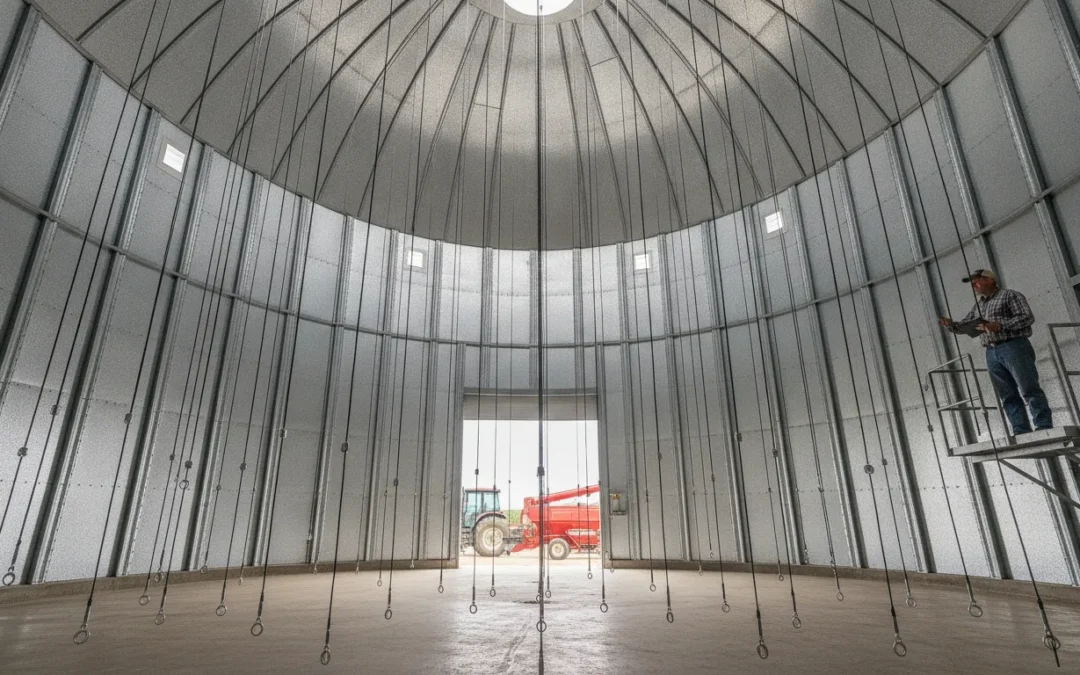
Grain storage problems rarely start where you can see them. Temperature differences inside a bin can move moisture toward the top and center of the grain mass, creating conditions for mold, insects, and spoilage. A monitoring system gives you an early signal so you can investigate and use aeration before a small hotspot becomes a costly storage loss.
Read the grain bin temperature monitoring guide
Good grain bin temperature cables installation starts with the bin design, cable layout, roof support, and the manufacturer’s instructions. For farmers who want a simpler setup, Grain Temp Guard is designed to be farmer-installable and uses visual and audio alarms. 110V external power, and battery backup to keep monitoring conditions in view.
Before choosing cable locations or hanging equipment, it helps to understand what the sensors measure and how those readings reveal changes inside stored grain.
What Do Grain Bin Temperature Cables Actually Measure?
A temperature cable is a way to see how conditions change at different depths inside a grain mass. Instead of relying on one reading at the bin wall or roof, the cable carries multiple sensors positioned along its length. Those sensors create a vertical temperature profile, helping you spot differences between grain near the top, middle, and lower portions of the bin.
That profile matters because stored grain does not always stay at one uniform temperature. Temperature differences can drive internal air movement and moisture migration toward the top and center of the grain mass. The result can be mold, insect activity, crusting, or localized spoilage before the problem is obvious from outside the bin. A cable does not prevent those conditions by itself. It gives you earlier information about where conditions are changing.
Temperature is not the same as humidity
Most grain bin temperature cables are designed to measure temperature at several points. Temperature readings can reveal a developing hotspot, but they do not tell you every detail about moisture conditions. Humidity is a separate measurement, and it can add useful context when you are evaluating the air around stored grain or deciding how to manage aeration.
For a broader view, the Grain Temp Guard monitoring system uses humidity and temperature monitoring. That distinction is important during product selection. Ask whether the system measures temperature only or combines temperature with humidity, then follow the product instructions for interpreting the readings. Do not treat a temperature number as a direct moisture-content reading unless the equipment is specifically designed and calibrated for that purpose.
How a hotspot changes your next move
A hotspot is a warning that conditions are not uniform. It may point to insect activity, mold development, moisture migration, or another storage issue that needs investigation. The purpose of monitoring is not to replace inspection or good storage practice. It is to help you find a change sooner and respond before grain quality declines further.
Monitoring works alongside aeration. Oklahoma State University Extension explains that aeration is used to cool stored grain and maintain more uniform temperature and moisture conditions, helping reduce spoilage, mold, and insect activity. You can read the Oklahoma State guidance on aeration and cooling of stored grain for the management principles behind that approach. Temperature cables show where the grain mass needs attention; aeration provides one of the tools for correcting uneven conditions. The right response still depends on the grain, bin design, weather, and your equipment manual.
How Many Cables Does Your Grain Bin Need?
There is no dependable cable-per-bushel rule that fits every grain bin. Cable count depends on the bin diameter, the depth of the grain, the number and location of sensing points. And the blind spots created by the roof, walls, center, or other equipment. A smaller bin may need only basic coverage, while a wider or deeper grain mass needs more sensing locations to show how conditions change across the bin.
Use the following Farm Shop MFG guidance as a starting point for planning a complete system. It is not a substitute for the product manual or an assessment of your specific bin.
| Bin capacity. | Approved system planning guidance. | What to confirm before installation. |
|---|---|---|
| 3,000 to 6,000 bushels. | 1 EndZone fan controller and 1 Grain Temp Guard Alarm HT. | Whether the sensing layout covers the grain depth and leaves no important wall or center blind spot. |
| 7,000 to 15,000 bushels. | 1 EndZone fan controller and 2 Grain Temp Guard Alarm HT units. | How the units and cables should be distributed for the bin diameter, roof structure, and expected grain depth. |
The guidance above describes system units, not a universal number of cables for every bin. For a smaller bin, one cable can provide a useful starting point for basic monitoring. As the bin gets larger, additional coverage may be needed to detect differences between the center, upper grain, and areas near the wall. Those differences matter because temperature-driven moisture migration can concentrate problems near the top and center of the grain mass. The University of Minnesota Extension explains that moisture can also move toward colder grain near the walls during winter conditions: Managing stored grain aeration.
Before you order or suspend a cable, map the bin rather than guessing from capacity alone. Note the diameter, maximum grain depth, roof access, fill and unload patterns, aeration equipment, and any areas a cable will not reach. The roof brackets and support structure must also handle the cable weight and tension. Final placement is controlled by the bin design and the specific product manual, including its approved support and sensor layout.
If you want monitoring and aeration planned together, review Farm Shop MFG’s complete moisture management package. It combines the system components used in the size guidance above, while your manual and bin conditions determine the final installation details.
How Should You Position Cables for Full Coverage?
Positioning matters as much as adding sensors. A cable gives you a temperature profile through the grain depth, but that profile is only useful when it represents the areas where conditions can change. Start by looking at the bin as several monitoring zones: the center of the grain mass, the upper surface, and the grain near the walls. Your bin diameter, roof structure, grain depth, and cable design determine the final layout. Use the product instructions as the controlling specification rather than applying a universal spacing rule.
Cover the center and upper grain first
The center and top deserve close attention because temperature differences can drive moisture toward the top and center of the grain mass. That migration can contribute to mold, insects, and spoilage. A cable that reaches through the relevant grain depth helps reveal whether one area is warming while the rest of the bin appears normal. Multiple sensors placed along the cable create a vertical profile, allowing you to compare readings at different depths instead of relying on a single temperature point.
Do not treat the top reading as a substitute for coverage below it. A warm reading near the surface may indicate a developing problem, while a deeper sensor can show whether the change extends into the grain. Use the readings together with your aeration plan and the conditions you observe during inspections.
Account for wall-related temperature patterns
Grain near the bin wall can behave differently from grain in the center. University of Minnesota Extension explains that, during cold weather, moisture can migrate toward colder grain near the walls. It also notes that airflow and temperature differences can move moisture inward when outside conditions are warmer than the grain. That is why a layout focused only on the center can leave a blind spot. Review the bin geometry and likely temperature patterns with the manufacturer before deciding where wall-adjacent coverage is practical. University of Minnesota Extension explains moisture migration in stored grain.
Keep cables straight and supported
Cables should hang in their intended position, without twisting, tangling, or bowing into an unmonitored area. Plan how each cable will be suspended and, where the bin design calls for it, secured near the floor or hopper area. These are practical installation considerations, not a Farm Shop MFG specification for every bin. Never invent an anchor location or hardware choice. Confirm that roof brackets and support points can carry the cable weight and tension, and keep openings, fan paths, and surrounding equipment clear. A straight, supported cable gives sensors a more dependable picture and makes future inspection easier.
Before filling, walk through the planned layout and check for interference with loading, unloading, and aeration equipment. If the bin design creates an unavoidable blind spot, document it and ask whether another cable or sensor position is appropriate. Good grain bin temperature cables installation starts with coverage you can explain, inspect, and maintain.
How to Approach Grain Bin Temperature Cables Installation on Your Farm
A clean installation starts with planning, not climbing into a full bin. Grain bin temperature cables installation is easiest when the bin is empty because you can inspect the interior. Position the sensors, and manage the cable without grain restricting access. Treat the product manual as the controlling document for your specific cable, monitor, brackets, connectors, and power requirements. A farmer-installable system should simplify the work, but it does not remove the need for sound structural and electrical practices.
- Plan the installation around the bin and monitoring layout. Review the device manual before ordering hardware or setting a date. Account for bin diameter, grain depth, access points, sensor coverage, and where the monitoring unit will be located. Mark the intended cable positions so the sensors can represent the grain mass rather than sit in one convenient area.
- Work with an empty bin and inspect it first. Remove residual grain and verify that the floor, roof, openings, ladders, and support members are in usable condition. Clean obstructions from cable routes and check that aeration openings and other access points will not be blocked. Do not enter a bin with flowing grain, and never treat an auger, conveyor, or unloading system as harmless. Follow your farm’s confined-space procedures.
- Confirm the roof support before suspending anything. Identify the approved bracket or suspension point specified by the manufacturer. The roof structure and brackets must be capable of carrying the cable weight and the tension created by suspension. If the structure is questionable, stop and obtain a qualified assessment rather than improvising a mounting point.
- Mount the hardware according to the manual. Install brackets, supports, and the monitoring unit using the supplied hardware and the product instructions. Keep the route clear of sharp edges and moving equipment. Do not drill, splice, or modify components unless the manufacturer specifically permits it.
- Suspend and secure each cable carefully. Lower the cable into position without forcing it, twisting it, or allowing it to rub against the bin wall. Use the specified anchoring method so the cable remains stable during filling, unloading, and grain movement. Confirm that the cable hangs straight and that its lower end will not interfere with the unloading path or other equipment.
- Connect power and monitoring components exactly as directed. With equipment de-energized, make only the connections described in the device manual. Do not guess at wire sizes, terminals, grounding, breakers, or voltage requirements. Apply lockout and electrical-safety procedures, and have a qualified electrician complete work outside your training or authorization. Grain Temp Guard systems include external power and battery backup, but the manual still governs setup and operation.
- Test before filling the bin. Verify that each sensor is recognized, readings appear as expected, and the visual or audio alarm operates according to the instructions. Confirm battery-backup behavior using the manufacturer’s test procedure. Correct loose connections, abnormal readings, or alarm problems before grain covers the cables.
- Document the finished setup. Record cable locations, sensor identifiers, installation date, test results, and any model or configuration details. Keep the manual and your notes with the bin records. This baseline makes future inspections faster and helps you spot a changed reading or cable problem after loading, unloading, or a major grain transfer.
How Do You Maintain and Test Temperature Cables Each Season?
A temperature cable is only useful when its readings remain trustworthy. Build a short inspection routine into spring startup, harvest preparation, and every major grain transfer. The goal is not to chase a single number. It is to spot a changing pattern early, confirm the equipment can alert you, and give aeration a fair chance to protect grain quality.
Start each season with a complete system check
Before filling the bin, inspect the visible cable, suspension points, sensor connections, and monitoring unit. Look for cuts, pulled connections, bent hardware, or anything that could have been stressed while the bin was emptied. If the cable has shifted, do not assume the sensor profile is still representative. Correct the installation according to the product instructions before relying on the readings.
Power up the monitor and confirm that each sensor reports a plausible reading. Compare nearby readings for unexpected jumps, then check the visual and audio alarms. Test the battery backup as directed by the manufacturer, and verify that the unit can continue operating if external power is interrupted. Grain Temp Guard systems use 110V external power, internal battery backup, and visual and audio alarms. Every test should follow the device manual rather than an improvised wiring procedure.
Inspect after unloading and keep airflow paths clear
Unloading and large grain transfers put cable assemblies under their greatest stress. After those events, inspect the cable and sensors for damage, looseness, or signs of pulling before the next storage cycle. This is especially important when equipment, grain flow, or cleanout work could have contacted the assembly. Keep a safe distance from moving grain. Never enter a bin with flowing grain, and follow lockout and electrical safety requirements.
At the same time, inspect fans, inlets, doors, unloading augers, and under-floor areas. Clean aeration openings and keep them sealed except when the fans are operating. Blocked or open pathways can undermine airflow and pest-management efforts. Proper aeration moves air through stored grain, helping reduce deterioration and storage losses. See the Oklahoma State guidance on aeration and cooling for the maintenance principle behind this check.
Read trends, then record what you find
Use readings to guide an aeration decision, not as universal alarm thresholds. Oklahoma State guidance discusses cooling stored grain to 30 F to 35 F in mid-winter and notes that stored-grain insects thrive around 75 F to 85 F. Those ranges are guidance for storage management, not automatic thresholds for every bin, crop, cable layout, or climate. Review the complete temperature pattern, grain condition, weather, and your equipment instructions before running fans.
Record inspection dates, sensor readings, alarm tests, battery checks, aeration cycles, and unusual observations. Comparing this log from one season to the next makes a gradual drift easier to see and helps you respond before a hotspot becomes a quality loss. For a practical schedule, review proper grain bin temperature monitoring.
Contact Farm Shop MFG about your grain monitoring setup
Frequently Asked Questions
How do you install temperature cables in a grain bin?
Plan the sensor locations, inspect the roof support, and install the system with the bin empty whenever possible. Mount the approved brackets, suspend and secure each cable so it stays positioned through grain handling. Connect power and test the alarm and battery functions according to the product manual. Never enter a bin with flowing grain, and follow all lockout and electrical-safety requirements.
How many temperature cables are needed per grain bin?
There is no universal cable-per-bushel rule. The right number depends on bin diameter, grain depth, cable design, and the areas you need to monitor. Use the equipment manual and plan for enough sensor coverage to identify differences between the center, top, and walls. Farm Shop MFG’s system guidance pairs one Grain Temp Guard Alarm HT with 3,000 to 6,000 bushels and two with 7,000 to 15,000 bushels, alongside EndZone fan control.
What is the best way to keep grain bin temperature cables straight?
Use the specified roof supports and anchoring method for your bin and cable system. Check that the support structure can carry the cable weight and tension, keep the cable clear of moving equipment, and confirm it is straight before filling. Do not substitute improvised tie-downs that could damage the cable or interfere with unloading.
What tools are required for installing grain bin temperature sensors?
Most installations require basic hand tools plus whatever fasteners, lifting equipment, and safety gear the system manual and bin design call for. The exact list changes with the roof structure and anchoring method, so confirm it before starting rather than improvising a mounting solution.
Can I install temperature cables in a full grain bin?
Installation is generally easiest with an empty bin because you can inspect supports, position sensors, and secure cables without working around stored grain. If a bin is already full, do not enter it to install or adjust cables. Ask the manufacturer for a safe, model-specific approach before proceeding.
Contact us about your grain bin setup
Choosing and testing grain temperature monitoring is easier when the equipment and bin layout are considered together. If you have questions about Grain Temp Guard, cable selection, or setup, contact Farm Shop MFG and share what you are working with. We can help you think through the next practical step for protecting stored grain.